Sunday, September 30, 2012

What's new.....double sides tapes like no other

AVAILABLE FROM TUESDAY 2 OCTOBER 2012

We searched high and low for double sided tape that is ACID and LIGNIN FREE which is Safe for card making and scrapbooking.

We have 2 TOP QUALITY double sided tapes for sale:

SUPER STICKY red liner tape; and
EXTRA STICKY tear easy tape

Go ahead and compare the price per metre or yard to the price you pay for your other brands like sticky strip wonder tape and other red liner tapes available on the market.   Also compare to other tears easy tapes on the market like high tack (our tape is stickier, scorepal etc. You will be amazed at the price and when you receive your order, you will understand what we mean by super and extra sticky!

If you have used red liner tape, you will know you have to use scissors to cut it but the other tape we are selling you simply tear.

SUPER STICKY red liner tape 6mm x 30 metres = $14.95 each


EXTRA STICKY tear easy tape 6mm x 30 metres = $2.50 each


Both tapes have hard plastic inner rings so they wont warp  easily

We hope you love them like we do!

Come back soon and don't forget to leave a comment!
 

Fancy That cards - TUTORIAL

Fancy That cards by Leanne Allinson.....

Hello Everyone! I hope you are all having a wonderful creative day. Today I want to share a little more Fancy That Dies goodness with some very simple three step cards.


Of course it also helps that I've used up some more of my off cuts! *grin* I love putting these extra bits of paper to good use.
I call these cards "three step" because well..., there are three steps to creating them! LOL!
step 1. choose and fold your off cut piece of cardstock. (being a 8.5in x 11in scrapper... I have a fair amount of 3.5in x 12in scraps in my stash!)
step 2. add three sections/strips/blocks of co-ordinating scrap patterned paper.
step 3. embellish with your dies. I have used a selection from Fancy That Dies. Check out the amazing range here!
You can't create cards any easier than this! Trust me. I've tried! hee hee...


By the way, I love how these dies cut vellum. It comes out perfectly. And the little touch of vellum builds up the layers on my flower. Got to love that!

products used: Fancy That Dies - butterfly quartet, sweet blooms, scalloped rolled rose, mixed leaves; cs - stampin' up, kaisercraft; pp - American Crafts Dear Lizzy, Jillibean Soup; other - Girls Paperie cardstock sticker, Greatest View sequins, vellum; tools - corner rounder.


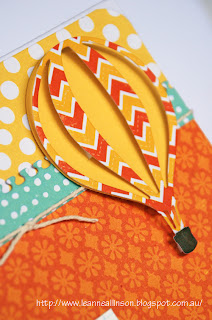
products used: Fancy That Dies - photo corners 2, high in the sky, zippity do da; cs - kaisercraft, stampin' up; pp - American Crafts (Dear Lizzy & Amy Tangerine), Crate Paper, Kaisercraft; other - Girls Paperie cardstock sticker, twine, maya road clear stamps, close to my heart ink.


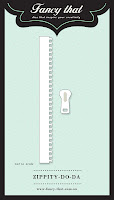
Notice on the middle strip of patterned paper (blue with white polkadot) I have used a die to create extra interest. It is zippity do da and I love using this die in particular, to add to my layers.
Thanks so much for visiting today. I hope you have fun creating a few cards out of your left over scraps of paper..x

Friday, September 28, 2012

Here we go again - Design Team Call for Fancy That dies

The Papercraft Hub (TPH) is looking for a few interested Design Team (DT) members to join our team!

Whether you are a card maker, scrapbooker or paper crafter, all are encouraged to apply.


Entering couldn’t be easier……simply leave a comment against this post by no later than midnight EST 23 November 2012 expressing your interest AND email thepapercrafthub@iinet.net.au with the following information :

  • your name
  • a short paragraph about yourself
  • your telephone number
  • your postal address    
  • a link to your current/active blog (DT members must have a blog)
  • attach 3 projects you created recently that showcases your style 

We will select and announce the 3 new members of our team on our blog shortly thereafter.


BENEFITS

  • Our lucky team members will be receiving products each release and be able to participate in the excitement that’s behind the scenes here at The Papercraft Hub! All products you receive are yours to keep!
  • You will also receive discounts off your purchases from TPH. 

CONDITIONS

Our DT Members will:


  • Post a minimum of 4 projects per month (1 per week) on TPH blog accompanied by a text describing your work, for our blog, publications and for use in advertising. (projects include but not limited to cards, layouts, altered projects, tutorials and/or videos). 
  • Be able to post how to’s and tutorials on projects created for TPH.  One (1) Tutorial/how to required per month.
  • Supply high quality photos of projects which include our watermark/label.
  • Provide physical examples of projects upon request for magazine publications, craft shows and other events.  
  • DT members must have an active/current blog and promote TPH whenever possible on their blog. (this includes use of logos/blinkies, linking posts/products to our online store www.thepapercrafthub.com.au and blog, and posting in online forums where possible/allowed such as Pinterest)
  • Participate in new release activities, blog hops and challenges etc.
  • Support your fellow DT members by following their blogs and commenting on their creations made on behalf of TPH
  • Support customers by regularly commenting on their creations made for TPH Challenges and blog hops
  • Display TPH Design Team Badge and link to other Design Team members on your blog
  • Upload TPH creations to at least 2 online galleries (in addition to your blog) on a regular basis, preferably at least once or twice a month.

Please note that design team experience is not necessary.

We hope to talk to you soon!

Thursday, September 27, 2012

Product Spotlight - Shrinky Dink or Graffix Shrink Plastic

 
Remember when we used to melt chip packets in the toaster and then make key rings out of them??? I never got sick of doing this {cheesy grin}.

Todays chips packets don't work the same way BUT the alternative is Shrink Plastic or Shrink Film and what you can do with them is limitless.

Cut them with dies or scissors but remember when die cutting shrink plastic, you will most likely need a steel shim/adaptor plate by Cherry Lynn.

Use it on your cards, on scrapbooks, make a charm or ring....what you make is only limited by your imagination.

Here are some ideas below.


Pinned Image
Image Credit

Pinned Image
 
Pinned Image
Image Credit

Great for kids crafts but remember an adult should supervise!

Get some now at The Papercraft Hub.

Thanks for stopping by!

Monday, September 24, 2012

So easy but effective card

Hi and welcome back.

Here is a card that you can make at home that's simple but very effective.

For this card, all you need is :

Fancy That Sweet Blooms
Paper
a glue gun
a bit of bling
Fancy That Extra sticky Double Sided Tape
Fancy That Easel Die
Sentiment stamp or alphabet dies


Made by Ariana


Thanks for stopping by!

Saturday, September 22, 2012

How do you store your ribbons?

I used to have ribbons everywhere....and I mean everywhere.  I also had them stored different ways until I realised there was a better way.

Introducing RIBBON RING.  A really great way to store your ribbons.

No more wrinkled, creased or tangled ribbons when you use the Ribbon Ring!

The beauty of the ribbon ring is that you can have one for every colour family and you can store quite a few ribbons on each ring.

The Ribbon Ring Starter set (available at The Papercraft Hub) comes with 30 ribbon cards and one ring to store all the cards on. To use the cards, you pull your ribbon through the two slots on the ribbon card and viola!

Grab a 3M hook or something more decorative and hang these on your wall for a great effect.  How effective would it be????

It makes finding your ribbons easy AND you can see what ribbons are running low at a glance.

Grab it quickly if you are planning to go to a card making or scrapbooking retreat.

Use it for your craft ribbon or to store hair ribbons.

Give the Ribbon Ring a try....I am sure you will love it!!!


Thanks for stopping by!

Friday, September 21, 2012

The versatility of My Favorite Things Die Namics

If you are ever looking for a quick card to make, you can't beat using dies like My Favorite Things, Fancy That and Lifestyle Crafts to name a few.

This card was so easy.

This was a very last minute card I made for a little girl named Chloe.

I always use the Fancy That 'Easel' die on all my cards.

On the front of the card I used My Favorite Things Fishtail Stax and Girly Graphic Tee Die and stamp set

The lightning bolt stamp I borrowed from the My Favorite Things Masculine Graphic Tee Die and stamp set.

And lastly there is the My Favorite Things By the letters alphabet.  This has got to be one of the most versatile alphabet dies on the market today!!!!

So if there's a sentiment or something you want on the shirt that is not in the Girly Graphic Tee set you know you can use other MFT stamp sets and create your own.

I'd love to see what last minute card you had to create?


created by Emilia

Don't forget to follow our blog and Thanks for stopping by!

One card... 3 flouishes and a couple of doilies


I just wanted to show how you can add any Fancy That flourish to these cards and it will still look great!!!!


We would love to see any projects you have made using Fancy That's flourishes.


Products used:


Come back soon!

Thursday, September 20, 2012

The Great Outdoors with Fancy That dies

"The Great Outdoors"... by Leanne Allinson


Hello Everyone! Today I am back to share a little "Fancy That Dies" goodness thanks to The Papercraft Hub! This week I have once again combined a layout about my older boys and... wait for it... flowers! LOL! (The things I do to my boys.. *grin*)...
 
"The Great Outdoors"
by Leanne Allinson


I love creating interesting backgrounds, especially when it draws the focus to my photos. The added texture/layer creates a fun element on my page. This gorgeous Moroccan die reminds me of a garden trellis and playing outside. Something my older boys love to do.
 
The flowers I’ve added to this boyish layout have been cut from masculine colours. Surely that counts for something! *grin* The “frilled blossoms” look amazing teamed up with the “scalloped rolled rose” and the smaller “scalloped floret”.
 

And to add some depth to the paper garden I’ve created, I have tucked a "swirly flourish" beneath the flower petals. Again the flourish emphasises the idea of a garden trellis with vines growing over it.
To finish off my layout I’ve added a journaling pocket to hold the details and decorated it with a simple “photo corner”.
So there you have it. Another boyish layout with flowers! hee hee. Thanks for visiting..x

Friday, September 14, 2012

Photogenic

By Leanne Allinson....


Okay. So I know I am totally biased when it comes to our kids. It's genetically wired into us as parents, I'm sure, to believe that our children are the cutest kids on earth, with the sweetest of smiles. :) And of course it helps portray that image when we usually only share the best photos we have of them. ;D But it wasn't until recently, when a friend was looking through my photos of Tahlia and just stopped and said.. "Gee... She's so photogenic", that I really stopped to think about it.

There was a certain amount of pride as I just stood back, smiled and silently agreed. :) And I know that at the moment (aged 12) she is starting to get really body conscious with certain WRONG ideas in her head as to what the media says she should look like, just to be pretty. So the photogenic conversation and her body image ideas have obviously stuck in my head. Because as I sat down to scrap in the last day or two, I converged the two thoughts into one and this is what I produced...
 
"photogenic"
Project and post by Leanne Allinson

 
Products used :
 
Fancy That Dies - Photo Corners set 2, Doily Flower 1, Sweet Blooms


Project and post by Leanne Allinson


I have used the new release Doily Flower 1 and photo corners 2 from the Fancy That Dies range available from The Papercraft Hub. And yes... I've snuck in the sweet blooms die...again!

Project and post by Leanne Allinson


I've cut out two of the doily flower 1's and used one as a matte under the main cluster. The other one I simply trimmed down to create these lacy edges on my border. A cute feminine touch. :)


I've also gone on to journal some more private thoughts about her ideas and included it as hidden journaling on my layout. I want her to remember how I interpreted her feelings on the subject of body image, at a later date. And no matter what anyone else says... I think she is the cutest, most photogenic girl on the planet! hahaha.. maybe even in the whole universe. :)